Answer these simple questions and we will find you the BEST prices
Which type of solar quotes do you need?

Tell us what you need to find a matching specialist
Get free quotes from professionals near you
Compare offers and choose the one that best matches your need
How to Install Cavity Wall Insulation to Make It Last

- Cavity wall insulation improves energy efficiency, cutting heat loss and saving up to £270 a year on energy bills for a typical semi-detached home.
- Proper installation can make cavity wall insulation last 20 to 100 years.
- Installing cavity wall insulation requires professional expertise to ensure even coverage, prevent dampness, and ensure durability.
Cavity wall insulation in the UK is one of the most effective ways to enhance your home's energy efficiency, comfort, and value. Designed for homes with cavity walls, two layers of wall with a hollow space in between, it works by filling this gap with insulating material, reducing heat loss and lowering energy bills. If your home was built after 1920, there's a good chance it has cavity walls, as this construction method became standard in most properties.
Properly installed cavity wall insulation can save a typical semi-detached home up to £270 annually on energy bills and increase property value by as much as 14%. However, knowing how to install cavity wall insulation correctly is essential to reap these benefits. Poor installation can lead to reduced thermal performance, moisture problems, and even structural damage.
This guide will provide step-by-step instructions on how to install cavity wall insulation, highlight key considerations, and help you avoid common mistakes. The best way to ensure proper installation is to work with a trusted installer.
Finding a reliable installer can be challenging and time-consuming, but WhatCost is here to assist you. We offer a straightforward solution by providing up to four free quotes, all without any obligation or hidden costs. Fill out a quick 30-second form to receive these quotes. Click below to learn more.
- Describe your needs
- Get free quotes
- Choose the best offer


How is cavity wall insulation installed?
To install cavity wall insulation, professional installers drill 22mm holes at 1-meter intervals along the exterior wall of your home. They inject insulation material into the cavity using specialised equipment, typically taking around two hours to complete. Once the insulation is in place, the drilled holes are carefully sealed to restore the wall's appearance.
The insulation materials commonly used include mineral wool, polystyrene beads, or polyurethane foam. While the procedure might sound straightforward, there's much more to how to install cavity wall insulation than meets the eye.
Despite being relatively quick, it is technically complex and requires the expertise of trained professionals. This project is not suited for DIY, as improper installation can result in moisture problems, poor insulation performance, or damage to the property.
1. Assessment and preparation

Before starting your cavity wall insulation, perform a cavity wall insulation check. This involves determining whether your walls are suitable for insulation. Factors such as wall type, the condition of the cavity, and whether your home is located in an area prone to dampness are critical to assess.
Addressing existing issues is essential to ensuring the insulation performs effectively. A professional installer will inspect the walls for signs of dampness, mould, or water ingress. These problems must be resolved before installation, as insulation can exacerbate moisture issues if the walls are not adequately maintained and dry.
Adequate ventilation is another critical consideration. Insulation can contribute to condensation buildup without proper airflow, increasing the risk of dampness. In some cases, additional vents may need to be installed to ensure proper ventilation and prevent moisture-related problems.
Failing to address these issues can lead homeowners to question, "Does cavity wall insulation cause damp?" While the insulation doesn't directly cause dampness, improper installation or inadequate preparation can lead to moisture problems. Professional expertise and careful preparation are essential to avoid these risks and ensure the insulation delivers the intended benefits.
While you can perform initial checks, learning how to install cavity wall insulation and working with a professional surveyor ensures a more accurate assessment. Their expertise saves time and helps prevent moisture buildup or structural damage, ensuring the insulation is effective and long-lasting.
2. Drilling holes and filling with insulation material
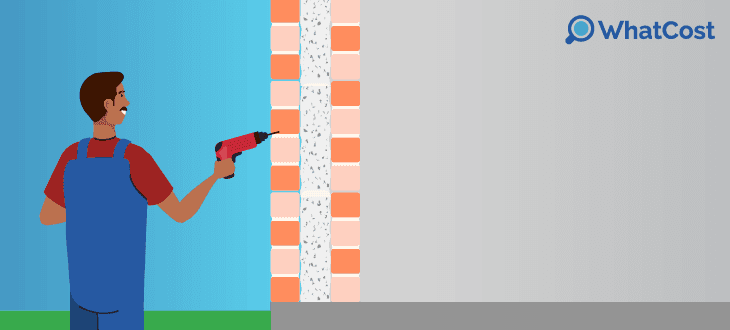
Once your walls have been assessed and prepared, the next step in understanding how to install cavity wall insulation involves drilling holes and injecting the insulation material. This process is a critical stage that requires precision and professional expertise to ensure effective insulation without causing damage to your property.
The installer will begin the installation by drilling a series of holes in your external wall around 22mm wide to ensure uniform distribution of the insulation material throughout the cavity. The exact spacing may vary depending on the wall’s construction and the insulation material being used.
Once the holes are prepared, the insulation material is injected into the cavity using specialised equipment. For materials like blown-in mineral wool or polystyrene beads, a high-pressure blower is used to evenly distribute the insulation throughout the cavity. If polyurethane foam spray is being used, it is applied in a liquid form and expands within the cavity to fill every gap.
During the injection process, the insulation material is carefully pumped into the cavity until it completely fills the space, leaving no gaps or voids. Even distribution is essential to prevent thermal bridging, which can compromise the effectiveness of the insulation. Professional installers use their expertise to monitor the process, ensuring consistent pressure and thorough coverage.
3. Sealing the holes and performing a thorough check
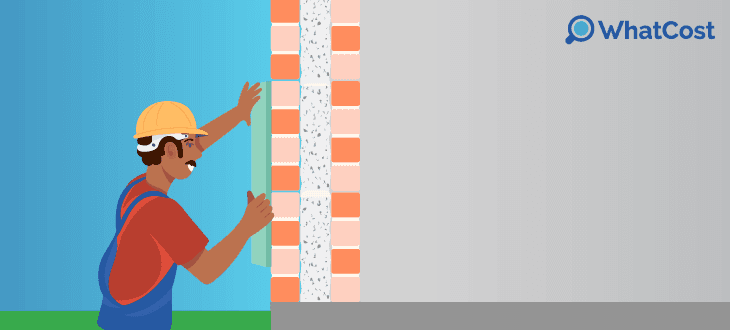
After insulating the cavity wall, the final steps include sealing the drilled holes and performing a comprehensive inspection to ensure the installation is complete and effective. Once the insulation is injected and the cavity is filled, the installer meticulously seals the drilled holes in the external wall. Using a mortar or a material that matches the original wall finish, they restore the wall's appearance, ensuring the sealant is applied neatly and securely to prevent water ingress or long-term damage. Care is taken to blend the patched areas seamlessly with the surrounding surface, preserving the wall's original aesthetic.
Sealing the holes properly is critical for maintaining the property's appearance, protecting the wall against weather exposure, and ensuring its durability over time. Following the sealing process, the installer conducts a detailed inspection to verify the quality of the insulation and confirm that the entire process has been carried out effectively. This inspection typically includes:
- Ensuring full coverage: Checking that the insulation material has completely filled the cavity without leaving gaps or voids that could reduce its effectiveness.
- Inspecting for signs of moisture: Verifying that no moisture has entered the wall during the installation process and that ventilation remains adequate.
- Testing for structural integrity: Ensuring that the drilling and sealing process hasn’t compromised the wall’s strength or appearance.
- Final wall assessment: Confirming that the wall looks neat and any repairs to the drilled holes are seamless.
This comprehensive post-installation check ensures that the insulation delivers maximum energy efficiency, prevents heat loss, and avoids potential issues such as dampness or thermal bridging. By sealing the holes with care and ensuring the insulation is properly installed, your home will fully benefit from cavity wall insulation.
Is DIY cavity wall insulation installation possible?
Typically, the cost of cavity wall insulation for a semi-detached 3-bedroom home is around £2,700. While this isn’t the most expensive way to insulate your home, it may feel costly for those on a budget. This can make DIY installation tempting as a way to save on labour costs. However, installing cavity wall insulation yourself is generally not recommended and can lead to expensive problems.
Poor installation can significantly reduce the insulation’s durability. Issues like uneven distribution or incomplete cavity filling can create cold spots and voids, leading to thermal bridging, where heat escapes through uninsulated areas. This not only lowers energy efficiency but also shortens the insulation’s lifespan.
Additionally, gaps or poorly sealed injection points can allow water ingress, causing damp and condensation within the cavity. Over time, this moisture can degrade the insulation material, reducing its performance and durability. Damp conditions can also lead to mould growth and structural damage, undermining the insulation's effectiveness.
For those wondering, how long does cavity wall insulation last, it typically lasts 20 to 100 years or more when professionally installed and maintained. Poor installation, however, can drastically reduce this lifespan, making premature replacement or repair necessary.
Hiring a professional installer is highly recommended to ensure the insulation is effective and long-lasting. Here at WhatCost, we can connect you with the best insulation specialists in your area. By filling out our 30-second form, we will provide you with up to four free quotes with no hidden costs or obligations. Click below to learn more.
- Describe your needs
- Get free quotes
- Choose the best offer
Find trusted cavity wall insulation installers
Choosing the right installer is crucial to ensuring your cavity wall insulation installation is effective, durable, and installed safely. To guarantee quality, it is highly recommended that you seek government-approved cavity wall insulation installers. These professionals are certified to meet strict standards, giving you peace of mind about the quality of their work.
Start by gathering quotes from multiple approved installers. Comparing quotes helps you find the best value while ensuring the work will be carried out to a high standard. Reputable installers will also conduct a thorough property assessment to confirm that your walls are suitable for cavity wall insulation and to identify potential issues, such as damp risks.
If your home doesn't have cavity walls or is unsuitable for cavity wall insulation, trusted installers can suggest alternatives to cavity wall insulation, such as external or internal wall insulation. These alternatives might be more appropriate for older solid-wall homes, ensuring you still benefit from improved energy efficiency and reduced heating costs.
Don't take chances with your home—invest in the expertise of qualified professionals to avoid costly mistakes and maximise the benefits of insulation. Start today by using the WhatCost service! Fill out our 30-second form, and we will provide up to four free quotes from top insulation specialists in your area. Don't waste any more time—click below to learn more.
- Describe your needs
- Get free quotes
- Choose the best offer
FAQ
- Describe your needs
- Get free quotes
- Choose the best offer